Tomcat Tuning and Troubleshooting
This section includes some tips, tuning, and troubleshooting techniques of Tomcat.
Startup and Deployment Time
The following tuning could dramatically reduce tomcat startup and WebApp deployment times.
Deploy Apps in Parallel
Apps in Tomcat are deployed sequntally by default, since the deployment is managed by a thread pool named Start-Stop threads. The number of threads in this pool is 1 by default.
The recommended settings is to be the same number of as the number of processors on the host server, to ensure actual parallelization.
To change the number of threads of this pool:
In TOMCAT_HOME/conf/server.xml Add startStopThreads="0" to <Host tag, this will create a thread per processor to handle parallel deployments, by default the value is 1 thread.
The Host tag should looks for something like this.
<Host name="localhost" appBase="webapps" unpackWARs="true" autoDeploy="true" startStopThreads="0">Jars Scanning
By default, Tomcat scans every class in every jar for annotations, web-fragments, and TLD’s, this could increase the startup and deployment times. There are many options to workaround this behavior, the most convenient (in my opinion) is as follows:
In TOMCAT_HOME/conf/catalina.properties:
-
Add
*.jartotomcat.util.scan.StandardJarScanFilter.jarsToSkipproperty, this will make Tomcat ignore all the jars by default from initial scanning. -
Set the needed jars to be scanned in
tomcat.util.scan.StandardJarScanFilter.jarsToScanproperty, in our case, we to ensure that we just scan the following jars. j-framework-web*.jar, primefaces*.jar,jsf*.jar, jersey-container*.jar, spring-web*.jar, spring-security-web*.jar
The catalina.properties should looks like this:
tomcat.util.scan.StandardJarScanFilter.jarsToSkip=*.jar

tomcat.util.scan.StandardJarScanFilter.jarsToScan=\
j-framework-web*.jar, \
primefaces*.jar,\
jsf*.jar, \
jersey-container*.jar, \
jar,spring-web*.jar, \
spring-security-web*.jar
WebApp Code-Coverage
In this section, we will show you the required steps to verify which backend code is being called by the front-end during the manual or automated testing.
| This tutorial is applied to Java Web Applications deployed on Tomcat, however, it could be also applied to any Java based application deployed as Standalone or as a Docker container. |
Steps
-
Create “test” folder inside your Apache-tomcat home, and as shown below, place the following jars inside it:
-
jacocoagent.jar
-
jacocoant.jar
-
jacococli.jar

-
-
In the “test” folder, create “to-html.bat” file that, which contains the following script:
java -jar jacococli.jar report test.exec --classfiles ../webapps/app/WEB-INF/classes --html html -
In Apache-tomcat home “bin” folder, create setenv.bat with the following contents:
SET CATALINA_OPTS=-javaagent:../test/jacocoagent.jar=destfile=../test.sexec,includes=com.app.*,append=false -
Start the tomcat with startup.bat script inside the bin folder.
-
Deploy your app on tomcat by placing the war file inside the webapps folder(app.war for example).
-
Run the tests on your app either manually or automatically using something like Selenium.
-
When done, shutdown the tomcat using bin/shutdown.bat batch inside tomcat.
-
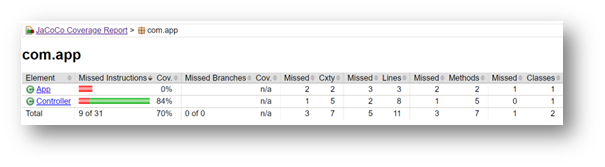
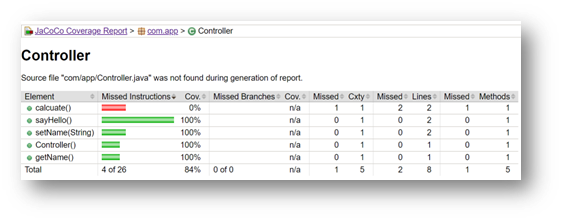
Inside tomcat/test double click on to-html.bat file, then an html folder will be created.
-
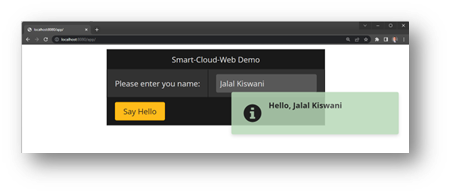
Run index.html and you will be able to see the something like the following results:

Profiling using JVisualVM
Below the steps required to profile Tomcat at runtime.
-
Add the following to
sentenv.batif windows andsetenv.shin Unix file inTOMCAT_HOME/bin
SET CATALINA_OPTS= %CATALINA_OPTS%
		-Dcom.sun.management.jmxremote
		-Dcom.sun.management.jmxremote.port=8888
		-Dcom.sun.management.jmxremote.ssl=false
-Dcom.sun.management.jmxremote.authenticate=false|
In windows, the above should be in the same line, in Unix, you can add forward slash |
-
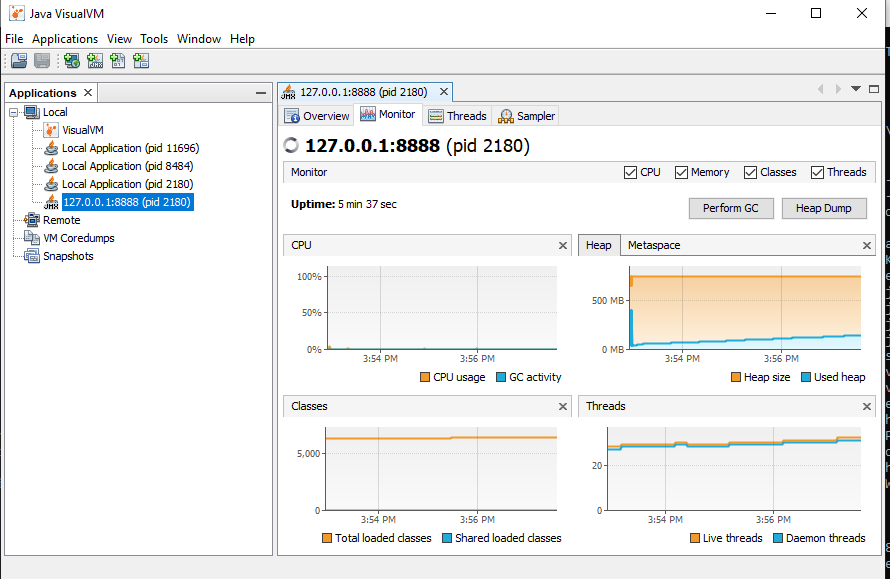
Open JDK_HOME/bin/JVisualVM (assuming Oracle JDK)
-
Add JMX connection and fill the host field
127.0.0.1:8888(assuming that you are locally troubleshooting Tomcat) -
Connect.
You should see something like this:
|
The above shall be used carefully due to performance and security concerns, authentication and SSL should be added as needed. |